Senin, 27 Desember 2010

How to dynamically number rows in a SELECT Transact-SQL statement

This article describes how to dynamically rank rows when you perform a SELECT statement by using a flexible method, which may be the only possible solution and which is faster than the procedural solution. Row numbering or ranking is a typical procedural issue. The solutions are typically based on loops and temporary tables; therefore, they are based on SQL Server loops and cursors. This technique is based on an auto join. The chosen relationship is typically "is greater than." Count how many times each element of a particular set of data fulfills the relationship "is greater than" when the set is compared to itself.

Note The following examples are based on the pubs database. By default, the Northwind sample database and the pubs sample database are not installed in SQL Server 2005. These databases can be downloaded from the Microsoft Download Center. For more information, visit the following Microsoft Web site:
http://go.microsoft.com/fwlink/?linkid=30196 (http://go.microsoft.com/fwlink/?linkid=30196)
After you download SQL2000SampleDb.msi, extract the sample database scripts by double-clicking SQL2000SampleDb.msi. By default, SQL2000SampleDb.msi will extract the database scripts and a readme file into the following folder:
C:\SQL Server 2000 Sample Databases
Follow the instructions in the readme file to run the installation scripts.

If you are using SQL Server 2005

We recommend that you use ranking functions that are provided as a new feature in SQL Server 2005. For more information about the ranking functions, visit the following Microsoft Developer Network (MSDN) Web site:
http://msdn2.microsoft.com/en-us/library/ms189798.aspx (http://msdn2.microsoft.com/en-us/library/ms189798.aspx)

Example 1

In this example:
  • Set 1 is authors.
  • Set 2 is authors.
  • The relationship is "last and first names are greater than."
  • You can avoid the duplicate problem by comparing the first + last names to the other first + last names.
  • Count the number of times the relationship is fulfilled by count(*).
Query:
select rank=count(*), a1.au_lname, a1.au_fname
   from authors a1, authors a2
   where a1.au_lname + a1.au_fname >= a2.au_lname + a2.au_fname
   group by a1.au_lname, a1.au_fname
   order by rank
    
Use the following code in SQL Server 2005.
select rank() OVER (ORDER BY a.au_lname, a.au_fname) as rank, a.au_lname, a.au_fname
   from authors a
   order by rank 
Result:
Rank        Au_Lname              Au_Fname
   ----        --------------        -----------
     1         Bennet                Abraham
     2         Blotchet-Halls        Reginald
     3         Carson                Cheryl
     4         DeFrance              Michel
     5         del Castillo          Innes
     6         Dull                  Ann
     7         Greene                Morningstar
     8         Green                 Marjorie
     9         Gringlesby            Burt
    10         Hunter                Sheryl
    11         Karsen                Livia
    12         Locksley              Charlene
    13         MacFeather            Stearns
    14         McBadden              Heather
    15         O'Leary               Michael
    16         Panteley              Sylvia
    17         Ringer                Albert
    18         Ringer                Anne
    19         Smith                 Meander
    20         Straight              Dean
    21         Stringer              Dirk
    22         White                 Johnson
    23         Yokomoto              Akiko

   (23 row(s) affected)
    

Example 2

In this example:
  • Rank stores by the number of books sold.
  • Set 1 is the number of books sold by store: select stor_id, qty=sum(qty) from sales group by stor_id.
  • Set 2 is the number of books sold by store: select stor_id, qty=sum(qty) from sales group by stor_id.
  • The relationship is "the number of books is greater than."
  • To avoid duplicates, you can (as an example) compare price*qty instead of qty.
Query:
select rank=count(*), s1.stor_id, qty=sum(s1.qty)
   from (select stor_id, qty=sum(qty) from sales group by stor_id) s1,
        (select stor_id, qty=sum(qty) from sales group by stor_id) s2
   where s1.qty >= s2.qty
   group by s1.stor_id
   order by rank
    
Result:
Rank     Stor_Id    Qty
   ----     -------    ---
   1         6380        8
   2         7896      120
   3         8042      240
   4         7067      360
   5         7066      625
   6         7131      780

   (6 row(s) affected)
    
Note The values in the Qty column are incorrect. However, the ranking of stores based on the quantity of books sold is correct. This is a defect of this method. You can use this method to return the ranking of stores if you do not care about the wrong quantity in the result.

Use the following code in SQL Server 2005.
select row_number() over (order by qty desc) as rank,s1.stor_id,s1.qty
from (select stor_id, qty=sum(qty) from sales group by stor_id) as s1
Result:
rank     stor_id  qty
-------  -------  ------
1        7131     130
2        7066     125
3        7067     90
4        8042     80
5        7896     60
6        6380     8

(6 row(s) affected)
Note In SQL Server 2005, you can receive the correct result of the ranking and the quantity when you use the ranking functions.

Example 3

In this example:
  • Rank the publishers by their earnings.
  • Set 1 is the total sales by publisher:
    select t.pub_id, sales=sum(s.qty*t.price)
            from sales s, titles t
            where s.title_id=t.title_id
              and t.price is not null
            group by t.pub_id
         
  • Set 2 is the total sales by publisher:
    select t.pub_id, sales=sum(s.qty*t.price)
            from sales s, titles t
            where s.title_id=t.title_id
              and t.price is not null
            group by t.pub_id
         
  • The relationship is "earns more money than."
Query:
select rank=count(*), s1.pub_id, sales=sum(s1.sales)
   from    (select t.pub_id, sales=sum(s.qty*t.price)
           from sales s, titles t
           where s.title_id=t.title_id
             and t.price is not null
           group by t.pub_id) s1,
           (select t.pub_id, sales=sum(s.qty*t.price)
           from sales s, titles t
           where s.title_id=t.title_id
             and t.price is not null
           group by t.pub_id) s2
   where s1.sales>= s2.sales
   group by s1.pub_id
   order by rank
    
Result:
Rank     Pub_Id   Sales
   ----     ------   --------
   1         0736    1,961.85
   2         0877    4,256.20
   3         1389    7,760.85

   (3 row(s) affected)
    
Note The values in the Sales column are incorrect. However, the ranking of publishers based on the earnings is correct.

Use the following code in SQL Server 2005.
select rank() over (order by sales desc) as rank,s1.pub_id,s1.sales 
from (select t.pub_id, sales=sum(s.qty*t.price)
     from sales s inner join titles t
     on s.title_id=t.title_id
     where  t.price is not null
     group by t.pub_id) as s1
Result:
rank     pub_id  sales
-------  ------  ---------
1        1389    2586.95
2        0877    2128.10
3        0736    1961.85

(3 row(s) affected)
    
Note You receive the correct result of the ranking and the earning when you use the ranking functions.

Drawbacks

  • Because of the cross join, this is not designed for working with a large number of rows. It works well for hundreds of rows. On large tables, make sure to use an index to avoid large scans.
  • This does not work well with duplicate values. When you compare duplicate values, discontinuous row numbering occurs. If this is not the behavior that you want, you can avoid it by hiding the rank column when you insert the result in a spreadsheet; use the spreadsheet numbering instead.

    Note If you are using SQL Server 2005, you can use the row_number() function to return the sequential number of a row, regardless of the duplicate rows.
Example:
select rank=count(*), s1.title_id, qty=sum(s1.qty)
   from (select title_id, qty=sum(qty) from sales group by title_id) s1,
        (select title_id, qty=sum(qty) from sales group by title_id) s2
   where s1.qty >= s2.qty
   group by s1.title_id
   order by rank
Result:
Rank    Title_Id    Qty
   ----    --------    ----
   1       MC2222        10
   4       BU1032        60
   4       BU7832        60
   4       PS3333        60
   7       PS1372       140
   7       TC4203       140
   7       TC7777       140
   10      BU1111       250
   10      PS2106       250
   10      PS7777       250
   11      PC1035       330
   12      BU2075       420
   14      MC3021       560
   14      TC3218       560
   15      PC8888       750
   16      PS2091      1728

   (16 row(s) affected)
    

Benefits

  • You can use these queries in views and result formatting.
  • You can shift the lower-ranked data more to the right.
Example 1:
CREATE VIEW v_pub_rank
   AS
   select rank=count(*), s1.title_id, qty=sum(s1.qty)
   from (select title_id, qty=sum(qty) from sales group by title_id) s1,
        (select title_id, qty=sum(qty) from sales group by title_id) s2
   where s1.qty >= s2.qty
   group by s1.title_id
    
Query:
select  publisher=convert(varchar(20),replicate (' ', power(2,rank)) +
           pub_id +
           replicate(' ', 15-power(2,rank))+': '),
           earnings=qty
   from v_pub_rank
    
Result:
Publisher       Earnings
   -------------   --------
     0736          : 1,961.85
       0877        : 4,256.20
           1389    : 7,760.85
    
Use the following code in SQL Server 2005.
CREATE VIEW v_pub_rank
AS
select rank() over (order by sales) as rank,s1.pub_id,s1.sales 
 from (select t.pub_id, sales=sum(s.qty*t.price)
 from sales s, titles t
 where s.title_id=t.title_id
 and t.price is not null
 group by t.pub_id) as s1
GO

select  publisher=convert(varchar(20),replicate (' ', power(2,rank)) +
 pub_id + replicate(' ', 15-power(2,rank))+': '),
 earnings=sales
from v_pub_rank order by rank
GO
Result:
publisher            earnings
-------------------- ---------------------
  0736             : 1961.85
    0877           : 2128.10
        1389       : 2586.95

(3 row(s) affected)

Example 2:
CREATE VIEW v_title_rank
   AS
   select rank=count(*), s1.title_id, qty=sum(s1.qty)
   from (select title_id, qty=sum(qty) from sales group by title_id) s1,
        (select title_id, qty=sum(qty) from sales group by title_id) s2
   where s1.qty >= s2.qty
   group by s1.title_id
    
Query:
select  Book=convert(varchar(45),replicate (' ', 2*rank) +
           title_id +
           replicate(' ', 35-2*rank)+': '),
           qty
   from v_title_rank
   order by rank
    
Result:
Book                                          Qty
   -------------------------------------------   ----
     MC2222                                 :      10
           BU1032                           :      60
           BU7832                           :      60
           PS3333                           :      60
                 PS1372                     :     140
                 TC4203                     :     140
                 TC7777                     :     140
                       BU1111               :     250
                       PS2106               :     250
                       PS7777               :     250
                         PC1035             :     330
                           BU2075           :     420
                               MC3021       :     560
                               TC3218       :     560
                                 PC8888     :     750
                                   PS2091   :    1728

   (16 row(s) affected)
    
Use the following code in SQL Server 2005.
CREATE VIEW v_title_rank
AS
select rank() over (order by qty) as rank, s1.title_id,s1.qty
from (select title_id, qty=sum(qty) from sales group by title_id) as s1
GO

select Book=convert(varchar(45),replicate (' ', 2*rank) +
title_id + replicate(' ', 35-2*rank)+': '), qty
from v_title_rank
order by rank
GO
Result:
Book                                          qty
--------------------------------------------- -----------
  MC2222                                 :    10
    BU1032                               :    15
    BU7832                               :    15
    PS3333                               :    15
          TC4203                         :    20
          TC7777                         :    20
          PS1372                         :    20
                BU1111                   :    25
                PS7777                   :    25
                PS2106                   :    25
                      PC1035             :    30
                        BU2075           :    35
                          MC3021         :    40
                          TC3218         :    40
                              PC8888     :    50
                                PS2091   :    108

(16 row(s) affected)

 http://support.microsoft.com/default.aspx?scid=http://support.microsoft.com:80/support/kb/articles/q186/1/33.asp&NoWebContent=1&NoWebContent=1

Dasar Interbase/Firebird Database Server

I. Pendahuluan
Borland Interbase Server (Selanjutnya kita sebut IB saja) adalah database server yang sangat handal dan sangat terkenal dikalangan programmer yang menggunakan Borland Delphi sebagai alat untuk mengembangkan aplikasi database-nya. Firebird Server (selanjutnya kita sebut Firebird saja) bisa dibilang sebagai “adik sepupu” dari IB karena fitur dan perluasan bahasa SQL-nya sangat mirip dengan IB. Firebird juga dapat diartikan sebagai versi free dari IB. Dalam tutorial ini, saya akan coba menjabarkan bagaimana cara instalasi Firebird, Administrasi database, koneksi ke IB/Firebird via command line(menggunakan MS-DOS/ cmd.exe) dan via GUI (Graphical User Interface). Khusus untuk koneksi database via GUI, kita akan menggunakan IBO Console yang dapat didownload di situs resmi firebird (www.ibphoenix.com). Interface dari IBO Console sangat mirip dengan IBConsole (GUI tool IB yang langsung terinstall saat anda melakukan instalasi IB server secara default). IBO Console diperlukan disini karena Firebird Server secara default tidak memiliki console GUI untuk administrasi dan management databasenya, disamping itu fitur IBO Console lebih lengkap (menurut opini saya pribadi J) dari IBConsole bawaan IB, dan yang paling penting IBO Console adalah Freeware J. Selain itu, saya juga akan membahas bagaimana cara untuk membuat database, table, view, generator, stored procedure dan trigger, dan sebagainya.
II. Instalasi Firebird
Sebelum memulai tutorial ini, anda harus sudah memasang IB/Firebird pada komputer anda. Bila anda sudah menginstal Delphi (Delphi 6 atau yang lebih baru) Profesional/ Enterprise edition dengan mode instalasi default, maka IB sudah terinstalasi pada system anda. Untuk menginstal Firebird, anda harus mendownloadnya terlebih di situs resminya (www.ibphoenix.com). Apabila anda belum memiliki binary/ installer Firebird Server, anda dapat mendownloadnya di situs resmi Firebird (www.ibphoenix.com).
Dalam tutorial ini, saya menggunaka Firebird Server versi 2.0.1 dengan platform Microsoft Windows XP SP1.
Setelah Firebird berhasil anda download, maka lakukanlah pemasangan Firebird dengan langkah-langkah seperti dibawah ini :
  1. Klik ganda pada binary/ setup file Firebird yang baru anda download.
Klik OK untuk melanjutkan proses instalasi.
  1. Setelah muncul Welcome Screen Instalasi Firebird, Klik next.
  1. Setelah muncul jendela ‘License agreement’, centang pilihan ‘I accept the agreement’, kemudian klik ‘Next’.
  1. Pilih lokasi instalasi Firebird anda (Defaultnya adalah C:\Program Files\Firebird\Firebird_2_0), kemudian klik ‘Next’. Pada pilihan ‘Install Component’, pilihlah pilihan-pilihan yang ada seperti gambar dibawah ini, klik ‘Next’.
  1. Bila pilihan additional task sudah muncul, isilah pilihan-pilihannya seperti gambar dibawah ini, kemudian klik ‘Next
Kemudian klik install. Tunggu sampai instalasi selesai. Bila jendela konfirmasi untuk me reboot/ restart computer muncul, klik Yes/ Ok .

III. Management Database
A. Via Command Line
Catatan :
Untuk membuka Command Line, pilih ‘Start->Run’, kemudian ketik ‘cmd’ (tanpa tanda petik) lalu klik tombol ‘Ok’.
Sebelum melakukan operasi pada Command Line, pertama-tama, tambahkan terlebih dahulu path lokasi instalasi Firebird kedalam Path system environtment computer anda. Untuk menambahkan Path Firebird kedalam Path system environtment, Lakukan langkah-langkah seperti dibawah ini :
  1. Klik kanan pada icon ‘My Computer->Properties’ yang ada pada desktop atau dapat juga dengan meng-klik ‘Start->control Panel->System’.
  2. Pilih Tab ‘Advanced’ dan klik ‘Environtment Variables’.
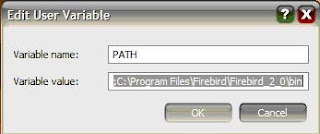
  1. Pada Kotak ‘User Varibles for xxx’ (dimana xxx adalah nama computer anda), apabila variable ‘PATH’ belum ada, maka klik tombol ‘New’ dan masukkan ‘PATH’ (tanpa tanda kutip) pada isian ‘Variable Name’, dan lokasi directory bin Firebird (missal anda menginstal Firebird pada lokasi ‘C:\Program Files\Firebird\Firebird_2_0’, maka lokasi directory bin Firebird Server adalah ‘C:\Program Files\Firebird\Firebird_2_0\bin’ tanpa tanda kutip) anda pada isian ‘Variable Value’. Sedangkan bila variable ‘PATH’ sudah ada, klik ‘PATH’, kemudian tekan tombol ‘Edit’. Setelah itu, tambahkan lokasi directory bin Firebird Server pada kotak isian ‘Variable Value’. Ingat, untuk memisahkan variable value, gunakan semi colon (tanda titik koma) pada akhir PATH yang sudah ada, missal (c:\php;C:\Program Files\Firebird\Firebird_2_0\bin)

1) Management User
Secara default SuperUser pada IB/Fireberd adalah ‘sysdba’ dan password defaultnya adalah ‘masterkey’ (tanpa tanda kutip). Untuk alasan keamanan, ubahlah password SuperUser anda setelah instalasi IB/Firebird. Dalam melakukan operasi penambahan/pengubahan/penghapusan data user, dibutuhkan hak akses SuperUser atau user yang memiliki hak akses untuk menambah/mengubah/menghapus data yang ada pada table RDB$USERS pada database security2.fdb (pada firebird).
Dalam melakukan operasi management user, dibutuhkan program gsec.exe yang ada pada directory bin IB/Firebird. Untuk melakukan operasi ini, buka Command Line dan tulislah:
gsec -user A -pass B – C -pw D
Penjelasan :
· parameter –user A adalah user yang melakukan operasi. Dalam hal ini yang melakukan operasi adalah user yang bernama A.
· parameter –pass B adalah password user yang melakukan operasi. Dalam hal ini password A adalah B
· parameter C adalah operasi yang dikenakan pada user C dimana <op> adalah operasi yang dilakukan.
Pilihan <op> adalah :
  • add untuk melakukan penambahan user ,
  • mo untuk mengubah user (modify), dan
  • del untuk menghapus user (delete).
Dalam hal ini, operasi yang dilakukan dikenakan pada user yang bernama C.
· Parameter –pw D adalah password yang digunakan oleh C dimana D adalah password dari C. parameter ini hanya diperlukan pada operasi penambahan dan pengubahan user saja. Untuk operasi penghapusan user, parameter ini tidak diperlukan.
Missal :
· Operasi untuk menambah user dengan nama user1 dan password pwuser1
gsec -user sysdba -pass masterkey -add user1 -pw user1
· Operasi untuk mengubah password user dengan nama user1 dan password barunya adalah user123
gsec -user sysdba -pass masterkey -add user1 -pw user1
· Operasi untuk menghapus user dengan nama user1
gsec -user sysdba -pass masterkey -del user1
2) Operasi Database
i) Membuat Database & Koneksi Database
Untuk membuat database, diperlukan program isql.exe yang ada pada directory bin IB/Firebird. Dalam pembuatan database, usahakan sebisa mungkin tidak menggunakan superuser (sysdba), karena sysdba memiliki control penuh pada IB/Firebird Server anda serta dapat melakukan apa saja pada server IB/firebird, termasuk merusak struktur, isi, serta data-data penting yang ada pada database anda. Gunakanlah sysdba hanya untuk management user saja.
Membuat Database
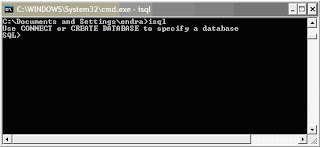
Untuk membuat database baru, bukalah terlebih dahulu Command Line, kemudian ketik ‘isql’ (tanpa tanda petik), lalu tekan enter.

Setelah muncul prompt SQL> , ketik
CREATE DATABASE ‘A’ page_size 1234 user ‘B’ password ‘C’;
Penjelasan :
    • A adalah nama database beserta full path nya, missal : c:\data\test.fdb atau d:\my data\test.gdb
    • 1234 adalah ukuran page size dari database. Nilai – nilai page size dapat diisi dengan 1024,2048,4096,8192,16384, dan kelipatannya. Secara default, ukuran dari page size adalah 1024.
    • B adalah nama user yang membuat (pemilik) database.
    • C adalah password user pembuat database.
Contoh:
CREATE DATABASE ‘c:\data\POS.fdb’ page_size 1024 user ‘user1’ password ‘user1’;
Kemudian klik Enter.
Maka akan terbentuk database bernama POS.fdb dengan lokasi di c:\data (di drive C pada directory data).
Koneksi ke Database
Untuk koneksi ke database, pada isql, ketik
CONNECT 'A' USER 'B' PASSWORD 'C';
Penjelasan :
· A adalah nama beserta lokasi lengkap (full path) dari database
· B adalah nama user yang akan melakukan koneksi kedalam database.
· C adalah password user yang akan melakukan koneksi.
Contoh :
CONNECT 'c:\data\POS.fdb' USER 'user1' PASSWORD 'user1';
ii) Backup/Restore
Backup dapat diartikan sebagai salinan dari file program atau dalam hal ini file database yang dibuat untuk memberi jaminan agar data yang ada tidak hilang atau terhapus apabila terjadi sesuatu pada file aslinya.
Sedangkan Restore dapat diartikan sebagai proses pengembalian file/data dari file backup yang dibuat sebelumnya untuk merecovery kerusakan file asli atau mengembalikan data file asli sesuai dengan isi data file asli saat dibuatnya file backup.
Untuk melakukan backup/restore database, diperlukan program gbak.exe yang ada pada directory bin IB/Firebird.
Secara umum untuk melakukan standard backup/restore, dapat dilakukan dengan mengeksekusi perintah berikut pada Command Line:
Gbak A –[b] B –user C –pas D
Penjelasan
Gbak adalah program yang dipanggil untuk melakukan operasi backup/restore
A adalah file input. Untuk backup, file inputnya berupa file IB/Firebird database (Extensinya : *.gdb | *.fdb | *.ib). Sedangkan untuk operasi restore inputnya berupa file backup (Extensinya : *.gbk | *.fbk | *.ibk).
[b] adalah operasi yang dilakukan. Operasi-operasi dalam penggunaan gbak adalah
-B(ACKUP_DATABASE) backup database ke dalam file
-BU(FFERS) override page buffers default
-C(REATE_DATABASE) membuat database dari backup file
-CO(NVERT) backup external files sebagai tabel
-E(XPAND) tanpa kompresi data
-FA(CTOR) blocking factor
-G(ARBAGE_COLLECT) mencegah data sampah
-I(NACTIVE) mematikan indek saat restore
-IG(NORE) mengabaikan bad checksums
-K(ILL) restore tanpa membuat shadows
-L(IMBO) abaikan transaksi dalam limbo
-M(ETA_DATA) hanya backup metadata
-MO(DE) "read_only" or "read_write" access
-N(O_VALIDITY) tidak merestore kondisi validitas database
-NT Format backup file Non-Transportable
-O(NE_AT_A_TIME) restore satu tabel saja
-OL(D_DESCRIPTIONS) simpan deskripsi metadata yang lama
-P(AGE_SIZE) override page size default
-PAS(SWORD) Firebird password
-R(ECREATE_DATABASE) [O(VERWRITE)] membuat (atau mengganti bila OVERWRITE digunakan) database from backup file
-REP(LACE_DATABASE) mengganti database dari file backup
-RO(LE) Firebird SQL role
-SE(RVICE) gunakan manager service
-T(RANSPORTABLE) transportable backup-data dlm format XDR
-USE_(ALL_SPACE) tanpa membuat cadangan untuk versi record
-USER Firebird user name
-V(ERIFY) laporkan tiap aksi yang diambil
-Y redirect/suppress status message output
-Z cetak version number
Contoh :
Backup :
Gbak c:\POS.fdb –b c:\POS_2007_aug_16.fbk –user user1 –pas user1
Perintah diatas akan membuat file backup yang bernama POS_2007_aug_16.fbk yang terletak di drive c:\ dari file database yang bernama POS.fdb yang terletak pada drive c:\. Operasi backup ini dilakukan oleh user1 dengan password dari user1 adalah user1.
Restore :
Gbak c:\POS_2007_aug_16.fbk –c c:\POS_Restore.fdb –user user1 –pas user1
Perintah diatas akan membuat file database yang bernama POS_Restore.fdb yang terletak pada drive c:\. Dimana POS_Restore.fdb ini dibuat dari backup file bernama POS_2007_aug_16.fbk yang terletak di drive c:\. Operasi ini dilakukan oleh user yang bernama user1 dengan passwordnya adalah user1 juga.
3) Domain
Domain dapat diartikan sebagai suatu tipe data global dalam suatu database IB/Firebird. Sebenarnya, domain merupakan tipe data standar yang mengalami kostumisasi sesuai dengan kebutuhan. Misal, untuk membuat standarisasi pengkodean dengan tipe karakter dengan panjang 9 karakter, maka dapat dibuat domain khusus untuk pengkodean dengan panjang 9 karakter tanpa harus mendeklarasikan ulang pendefinisian panjang dan tipe datanya tiap kali mendefinisikan kolom yang sama (terutama untuk secondary key pada tabel detail).
Deklarasi umum domain adalah sebagai berikut:
CREATE DOMAIN nama_domain AS tipe_data DEFAULT nilai_default CHECK [pembatasan_nilai]
Nama_domain adalah nama dari domain yang akan dibuat.
Tipe_data adalah tipe data domain. Tipe-tipe ini dapat bernilai :
Smallint
Integer
Bigint (Firebird v.2.0.1 keatas)
Float
Double Precission
Date
Time
Timestamp
Decimal
Numeric
Char
Varchar
Blob

DataGridView in Windows Forms

Tip 1 – Populating a DataGridView
 
In this short snippet, we will populate a DataGridView using the LoadData() method. This method uses the SqlDataAdapter to populate a DataSet. The table ‘Orders’ in the DataSet is then bound to the BindingSource component which gives us the flexibility to choose/modify the data location.
C#
public partial class Form1 : Form
    {
        private SqlDataAdapter da;
        private SqlConnection conn;
        BindingSource bsource = new BindingSource();
        DataSet ds = null;
        string sql;
 
        public Form1()
        {
            InitializeComponent();
        }
 
        private void btnLoad_Click(object sender, EventArgs e)
        {
            LoadData();
        }
 
        private void LoadData()
        {
string connectionString = "Data Source=localhost;Initial Catalog=Northwind;" + "Integrated Security=SSPI;";
            conn = new SqlConnection(connectionString);
sql = "SELECT OrderID, CustomerID, EmployeeID, OrderDate, Freight," + "ShipName, ShipCountry FROM Orders";
 
            da = new SqlDataAdapter(sql, conn);
            conn.Open();
            ds = new DataSet();
            SqlCommandBuilder commandBuilder = new SqlCommandBuilder(da);          
            da.Fill(ds, "Orders");
            bsource.DataSource = ds.Tables["Orders"];
            dgv.DataSource = bsource;          
        }
    }
VB.NET
Public Partial Class Form1
      Inherits Form
            Private da As SqlDataAdapter
            Private conn As SqlConnection
            Private bsource As BindingSource = New BindingSource()
            Private ds As DataSet = Nothing
            Private sql As String
 
            Public Sub New()
                  InitializeComponent()
            End Sub
 
Private Sub btnLoad_Click(ByVal sender As Object, ByVal e As EventArgs)
                  LoadData()
            End Sub
 
            Private Sub LoadData()
Dim connectionString As String = "Data Source=localhost;Initial Catalog=Northwind;" & "Integrated Security=SSPI;"
                  conn = New SqlConnection(connectionString)
sql = "SELECT OrderID, CustomerID, EmployeeID, OrderDate, Freight," & "ShipName, ShipCountry FROM Orders"
 
                  da = New SqlDataAdapter(sql, conn)
                  conn.Open()
                  ds = New DataSet()
Dim commandBuilder As SqlCommandBuilder = New SqlCommandBuilder(da)
                  da.Fill(ds, "Orders")
                  bsource.DataSource = ds.Tables("Orders")
                  dgv.DataSource = bsource
            End Sub
End Class
 
Tip 2 – Update the data in the DataGridView and save changes in the database
 
After editing the data in the cells, if you would like to update the changes permanently in the database, use the following code:
C#
        private void btnUpdate_Click(object sender, EventArgs e)
        {
            DataTable dt = ds.Tables["Orders"];
           this.dgv.BindingContext[dt].EndCurrentEdit();
            this.da.Update(dt);
        }
VB.NET
Private Sub btnUpdate_Click(ByVal sender As Object, ByVal e As EventArgs)
                  Dim dt As DataTable = ds.Tables("Orders")
                  Me.dgv.BindingContext(dt).EndCurrentEdit()
                  Me.da.Update(dt)
      End Sub
Tip 3 – Display a confirmation box before deleting a row in the DataGridView
 
Handle the UserDeletingRow event to display a confirmation box to the user. If the user confirms the deletion, delete the row. If the user clicks cancel, set e.cancel = true which cancels the row deletion.
C#
private void dgv_UserDeletingRow(object sender, DataGridViewRowCancelEventArgs e)
        {
            if (!e.Row.IsNewRow)
            {
                DialogResult res = MessageBox.Show("Are you sure you want to delete this row?", "Delete confirmation",
                         MessageBoxButtons.YesNo, MessageBoxIcon.Question);
                if (res == DialogResult.No)
                    e.Cancel = true;
            }
        }
VB.NET
Private Sub dgv_UserDeletingRow(ByVal sender As Object, ByVal e As DataGridViewRowCancelEventArgs)
                  If (Not e.Row.IsNewRow) Then
                        Dim res As DialogResult = MessageBox.Show("Are you sure you want to delete this row?", "Delete confirmation", MessageBoxButtons.YesNo, MessageBoxIcon.Question)
                        If res = DialogResult.No Then
                              e.Cancel = True
                        End If
                  End If
End Sub
Tip 4 – How to autoresize column width in the DataGridView
 
The snippet shown below, first auto-resizes the columns to fit its content. Then the AutoSizeColumnsMode is set to the ‘DataGridViewAutoSizeColumnsMode.AllCells’ enumeration value which automatically adjust the widths of the columns when the data changes.
C#
private void btnResize_Click(object sender, EventArgs e)
        {
            dgv.AutoResizeColumns();
            dgv.AutoSizeColumnsMode = DataGridViewAutoSizeColumnsMode.AllCells;
 
        }
VB.NET
Private Sub btnResize_Click(ByVal sender As Object, ByVal e As EventArgs)
                  dgv.AutoResizeColumns()
                  dgv.AutoSizeColumnsMode = DataGridViewAutoSizeColumnsMode.AllCells
 
End Sub
 
Tip 5 - Select and Highlight an entire row in DataGridView
 
C#
int rowToBeSelected = 3; // third row
if (dgv.Rows.Count >= rowToBeSelected)
{             
       // Since index is zero based, you have to subtract 1
        dgv.Rows[rowToBeSelected - 1].Selected = true;
}
VB.NET
Dim rowToBeSelected As Integer = 3 ' third row
If dgv.Rows.Count >= rowToBeSelected Then
         ' Since index is zero based, you have to subtract 1
            dgv.Rows(rowToBeSelected - 1).Selected = True
End If
Tip 6 - How to scroll programmatically to a row in the DataGridView
 
The DataGridView has a property called FirstDisplayedScrollingRowIndex that can be used in order to scroll to a row programmatically.
C#
int jumpToRow = 20;
if (dgv.Rows.Count >= jumpToRow && jumpToRow >= 1)
{             
        dgv.FirstDisplayedScrollingRowIndex = jumpToRow;
        dgv.Rows[jumpToRow].Selected = true;
}
 
VB.NET
Dim jumpToRow As Integer = 20
If dgv.Rows.Count >= jumpToRow AndAlso jumpToRow >= 1 Then
            dgv.FirstDisplayedScrollingRowIndex = jumpToRow
            dgv.Rows(jumpToRow).Selected = True
End If
 
Tip 7 - Calculate a column total in the DataGridView and display in a textbox
 
A common requirement is to calculate the total of a currency field and display it in a textbox. In the snippet below, we will be calculating the total of the ‘Freight’ field. We will then display the data in a textbox by formatting the result (observe the ToString("c")) while displaying the data, which displays the culture-specific currency.
C#
private void btnTotal_Click(object sender, EventArgs e)
        {
            if(dgv.Rows.Count > 0)
             txtTotal.Text = Total().ToString("c");
        }
 
        private double Total()
        {
            double tot = 0;
            int i = 0;
            for (i = 0; i < dgv.Rows.Count; i++)
            {
                tot = tot + Convert.ToDouble(dgv.Rows[i].Cells["Freight"].Value);
            }
            return tot;
        }
VB.NET
Private Sub btnTotal_Click(ByVal sender As Object, ByVal e As EventArgs)
                  If dgv.Rows.Count > 0 Then
                   txtTotal.Text = Total().ToString("c")
                  End If
End Sub
 
Private Function Total() As Double
                  Dim tot As Double = 0
                  Dim i As Integer = 0
                  For i = 0 To dgv.Rows.Count - 1
                        tot = tot + Convert.ToDouble(dgv.Rows(i).Cells("Freight").Value)
                  Next i
                  Return tot
End Function
Tip 8 - Change the Header Names in the DataGridView
 
If the columns being retrieved from the database do not have meaningful names, we always have the option of changing the header names as shown in this snippet:
C#
private void btnChange_Click(object sender, EventArgs e)
        {
            dgv.Columns[0].HeaderText = "MyHeader1";
            dgv.Columns[1].HeaderText = "MyHeader2";
        }
 
VB.NET
Private Sub btnChange_Click(ByVal sender As Object, ByVal e As EventArgs)
                  dgv.Columns(0).HeaderText = "MyHeader1"
                  dgv.Columns(1).HeaderText = "MyHeader2"
End Sub
 
Tip 9 - Change the Color of Cells, Rows and Border in the DataGridView
 
C#
private void btnCellRow_Click(object sender, EventArgs e)
        {
            // Change ForeColor of each Cell
            this.dgv.DefaultCellStyle.ForeColor = Color.Coral;
            // Change back color of each row
            this.dgv.RowsDefaultCellStyle.BackColor = Color.AliceBlue;
            // Change GridLine Color
            this.dgv.GridColor = Color.Blue;
            // Change Grid Border Style
            this.dgv.BorderStyle = BorderStyle.Fixed3D;
        }
VB.NET
Private Sub btnCellRow_Click(ByVal sender As Object, ByVal e As EventArgs)
                  ' Change ForeColor of each Cell
                  Me.dgv.DefaultCellStyle.ForeColor = Color.Coral
                  ' Change back color of each row
                  Me.dgv.RowsDefaultCellStyle.BackColor = Color.AliceBlue
                  ' Change GridLine Color
                  Me.dgv.GridColor = Color.Blue
                  ' Change Grid Border Style
                  Me.dgv.BorderStyle = BorderStyle.Fixed3D
End Sub
Tip 10 - Hide a Column in the DataGridView
 
If you would like to hide a column based on a certain condition, here’s a snippet for that.
C#
private void btnHide_Click(object sender, EventArgs e)
        {
            this.dgv.Columns["EmployeeID"].Visible = false;
        }
VB.NET
Private Sub btnHide_Click(ByVal sender As Object, ByVal e As EventArgs)
                  Me.dgv.Columns("EmployeeID").Visible = False
End Sub
 
Tip 11 - Handle SelectedIndexChanged of a ComboBox in the DataGridView
 
To handle the SelectedIndexChanged event of a DataGridViewComboBox, you need to use the DataGridView.EditingControlShowing event as shown below. You can then retrieve the selected index or the selected text of the combobox.
C#
private void dataGridView1_EditingControlShowing(object sender, DataGridViewEditingControlShowingEventArgs e)
        {
            ComboBox editingComboBox = (ComboBox)e.Control;
            if(editingComboBox != null)
                editingComboBox.SelectedIndexChanged += new System.EventHandler(this.editingComboBox_SelectedIndexChanged);
        }
private void editingComboBox_SelectedIndexChanged(object sender, System.EventArgs e)
        {
            ComboBox comboBox1 = (ComboBox)sender;
            // Display index
            MessageBox.Show(comboBox1.SelectedIndex.ToString());
            // Display value
            MessageBox.Show(comboBox1.Text);
        }
VB.NET
Private Sub dataGridView1_EditingControlShowing(ByVal sender As Object, ByVal e As DataGridViewEditingControlShowingEventArgs)
                  Dim editingComboBox As ComboBox = CType(e.Control, ComboBox)
                  If Not editingComboBox Is Nothing Then
                        AddHandler editingComboBox.SelectedIndexChanged, AddressOf editingComboBox_SelectedIndexChanged
                  End If
End Sub
 
Private Sub editingComboBox_SelectedIndexChanged(ByVal sender As Object, ByVal e As System.EventArgs)
                  Dim comboBox1 As ComboBox = CType(sender, ComboBox)
                  ' Display index
                  MessageBox.Show(comboBox1.SelectedIndex.ToString())
                  ' Display value
                  MessageBox.Show(comboBox1.Text)
End Sub
Tip 12 - Change Color of Alternate Rows in the DataGridView
 
C#
private void btnAlternate_Click(object sender, EventArgs e)
        {
            this.dgv.RowsDefaultCellStyle.BackColor = Color.White;
            this.dgv.AlternatingRowsDefaultCellStyle.BackColor = Color.Aquamarine;
        }
VB.NET
Private Sub btnAlternate_Click(ByVal sender As Object, ByVal e As EventArgs)
                  Me.dgv.RowsDefaultCellStyle.BackColor = Color.White
                  Me.dgv.AlternatingRowsDefaultCellStyle.BackColor = Color.Aquamarine
End Sub
 
Tip 13 - Formatting Data in the DataGridView
 
The DataGridView exposes properties that enable you to format data such as displaying a currency column in the culture specific currency or displaying nulls in a desired format and so on.
C#
private void btnFormat_Click(object sender, EventArgs e)
        {
            // display currency in culture-specific currency for
            this.dgv.Columns["Freight"].DefaultCellStyle.Format = "c";
            // display nulls as 'NA'
            this.dgv.DefaultCellStyle.NullValue = "NA";
        }
VB.NET
Private Sub btnFormat_Click(ByVal sender As Object, ByVal e As EventArgs)
                  ' display currency in culture-specific currency for
                  Me.dgv.Columns("Freight").DefaultCellStyle.Format = "c"
                  ' display nulls as 'NA'
                  Me.dgv.DefaultCellStyle.NullValue = "NA"
End Sub
 
Tip 14 – Change the order of columns in the DataGridView
 
In order to change the order of columns, just set the DisplayIndex property of the DataGridView to the desired value. Remember that the index is zero based.
C#
private void btnReorder_Click(object sender, EventArgs e)
        {
             dgv.Columns["CustomerID"].DisplayIndex = 5;
             dgv.Columns["OrderID"].DisplayIndex = 3;
             dgv.Columns["EmployeeID"].DisplayIndex = 1;
             dgv.Columns["OrderDate"].DisplayIndex = 2;
             dgv.Columns["Freight"].DisplayIndex = 6;
             dgv.Columns["ShipCountry"].DisplayIndex = 0;
             dgv.Columns["ShipName"].DisplayIndex = 4;
        }
VB.NET
Private Sub btnReorder_Click(ByVal sender As Object, ByVal e As EventArgs)
                   dgv.Columns("CustomerID").DisplayIndex = 5
                   dgv.Columns("OrderID").DisplayIndex = 3
                   dgv.Columns("EmployeeID").DisplayIndex = 1
                   dgv.Columns("OrderDate").DisplayIndex = 2
                   dgv.Columns("Freight").DisplayIndex = 6
                   dgv.Columns("ShipCountry").DisplayIndex = 0
                   dgv.Columns("ShipName").DisplayIndex = 4
End Sub